Visit eTAS: A web based time attendance system
1. Registration
 For Registration of company for first time, please click on this icon above.


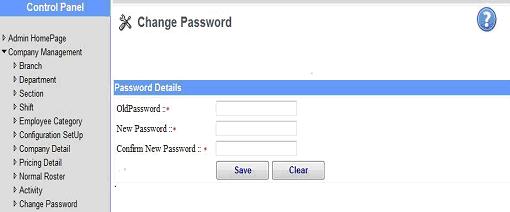
 Please enter old password first then set new password and press save button for successful operation.
2.1 First time setup organization


2.2 Department Setup

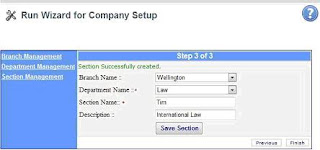
2.3 Section Setup


2.6 Configuration Setup

2.7 Company Details
 Please click on Company Details from control panel at left hand side to edit company details and press Save button for successful operation.
2.8 Pricing Details

2.9 Normal Roaster


You will do roster for every day of week in same manner, which is done by you before.
2.10 Activity: - For each time duration of your work, you may also define the type of activity, which may help you in job costing.

3 Employee Management


3.1 Employee List
 Please click on Employee to see whole employee list of company and user can sort out list by branch, department, section, first name and last name.
4 eTAS Management


4.1 Time Management


4.2 Leave Management

5 Report Management:-
Here user can see all reporting in this section

5.1 Weekly Report

5.2 In/Out Report

5.3 Activity Report

1. Registration
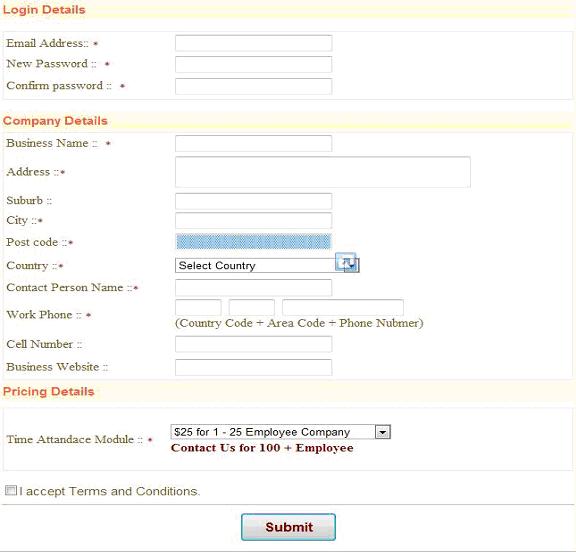
- This is the first screen appear after Registration icon pressed.
- For successfully Registration user have to enter all mandatory fields and press submit button at bottom.
- After successfully registration of company, please click on Administration icon.
2.1 First time setup organization

· First time user please click here link to setup your Organization.
2.2 Branch Setup
Above screen will appear after setup organization Run Wizard start.
Please enter branch name and description and press save branch button for successful operation.
User can also enter multiple branches either by Branch Management link on left hand side of run wizard or one by one entering in above fields and save branch.2.2 Department Setup

Above screen will appear after setup of branch and pressed Next button at bottom.
Please enter department name and description under branch it follow, please press save department button for successful operation.
User can also enter multiple departments either by department Management link on left hand side of run wizard or one by one entering in above fields and save department.2.3 Section Setup

· Above screen will appear after setup of departments and pressed Next button at bottom.
· Please enter section name and description under branch and department it follow, please press save section button for successful operation.
· User can also enter multiple sections either by Section Management link on left hand side of run wizard or one by one entering in above fields and save department.
· After setup of branch, department and section, then please press finish button.
2.4 Shift Setup
· Please click on Shift from control panel at left hand side.
· Please select branch from top under which you want to specify shift.
· Please enter shift name and description under branch and please configure start time and end time of shift.
· Please click on Add Shift button for successful operation.
· User can also enter multiple shifts according to company timing.
· To view all update done by user in shift Management, please click on Shift from control panel at left hand side.
2.5 Employee Category
· Please click on Employee Category from control panel at left hand side.
· Please enter category name and description, and press Add Category button for successful operation.
User can also enter multiple categories according to company structure.2.6 Configuration Setup

· Please click on Configuration Setup from control panel at left hand side.
Please enter all mandatory fields according to company structure, and press Save button for successful operation.2.7 Company Details

2.8 Pricing Details

· Please click on Pricing Details from control panel at left hand side to see pricing and edit.
Note: - Please add all employees first to do next step. (Please Jump to Section 3 Employee Management).

· Please click on Normal Roster from control panel at left hand side to create normal roster for branch or department or section.
· Please select branch from top first, where you already created shift.
· After that above screen will appear.
Please click on particular day where you want to add employee. Then below screen will appear.
· Please select employee name, then his start time and end time.
· Please select Add To Roster button to perform your action.
If you want to go back to Normal Roster to see changes done by you, please click on Back Button.
You will do roster for every day of week in same manner, which is done by you before.
2.10 Activity: - For each time duration of your work, you may also define the type of activity, which may help you in job costing.
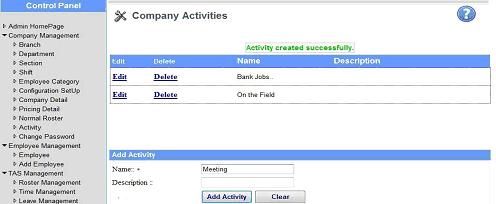
· Please click on Activity from control panel at left hand side to create activities of company for employee to perform.
Please enter name and description of activity then press Add Activity button.3 Employee Management


· Please click on Employee Management or Add employee from control panel at left hand side to add existing and new employee.
Please fill all relevant fields of employee and press save button.3.1 Employee List

4 eTAS Management

· Please click on TAS Management from control panel at left hand side to do Roster Management.
· Please select Branch from top, whose roster you want to make.
Screen below will appear.
· Here you can also import normal roster (2.9) as a default roster by clicking on Import Default Roster button.
· Then follow same procedure to add employee on particular day for working hours, which was done by you in section 2.9.
Please click on particular day where you want to add employee. Then below screen will appear.
· Please select employee name, then his start time and end time.
· Please select Add To Roster button to perform your action.
If you want to go back to Roster to see changes done by you, please click on Back to Roster Button.4.1 Time Management

· Please click on Time Management from control panel at left hand side to do approval for worked hours by employee in last week by Admin.
Please select Branch from top, whose timesheet you want to see and then following screen will appear.
· In this section administrator can see how many hours done by employee in particular branch or department or section for approval purpose.
· Administrators have to click on Accepted button to finalize the timesheet of last week.
Administrator also exports this timesheet to Excel for his record purpose by clicking on T Ecxel button at right hand side4.2 Leave Management

· Please click on Leave Management from control panel at left hand side to do approval of leave application by employee.
Please click on Save button after filling all mandatory fields. 5 Report Management:-
Here user can see all reporting in this section

· Please click on Final Weekly Report from control panel at left hand side to do approval of worked hours by employee in last week by Admin.
· Please select Branch from top, whose timesheet you want to see and then below screen will appear.
· In this section administrator can see how many hours done by employee in particular branch or department or section for approval purpose.
· Administrators have to click on Accepted button to finalize the timesheet of last week.
Administrator also exports this timesheet to Excel for his record purpose by clicking on T Ecxel button at right hand side.5.1 Weekly Report
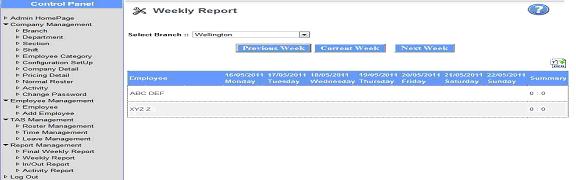
· Please click on Weekly Report from control panel at left hand side to see number of hours done by employee on particular day.
Administrator also exports this report to Excel for his record purpose by clicking on T Ecxel button at right hand side.5.2 In/Out Report

· Please click on In/Out Report from control panel at left hand side to see in and out time of employee by week or branch or employee.
Administrator also exports this report to Excel for his record purpose by clicking on T Ecxel button at right hand side5.3 Activity Report

· Please click on Activity Report from control panel at left hand side to see summary of job done by employee basis on activity by week or branch or employee.
Administrator also exports this report to Excel for his record purpose by clicking on T Ecxel button at right hand side6 Log Out
After you have configured your company details, you may distribute user name and passwords to your employees and they may start using the time attendance by going to user area.
In user area, users may go to “In / Out details and punch in their IN or OUT times and if configured may select their activity for that time duration.
If you prefer to use your computer desktop instead of using browser, You may download ePunch from Administration section and start using it to punch in your in and out times.
I wanted to thank you for this excellent read!! I definitely loved every little bit of it.Cheers for the info!!!! & This is the perfect blog for anyone who wants to know about this topic. You know so much its almost hard to argue with you
ReplyDeleteTime and Attendence